Create A TIFF File from a Table in Microsoft Word Using Photoshop Elements
One of the topics Tom discussed was preparing Tables and Figures for print publications. They often need to be sent as TIFF files. Tom showed us how to create the files using Microsoft Word, Adobe Acrobat Pro, and Adobe Photoshop.
But since I don't have Adobe Acrobat Pro, I had to figure out another way to do it. Turns out, it's easy to do in either Adobe Photoshop or Adobe Photoshop Elements. I have Elements 2023 so instructions are based on that version - my guess is process will be similar in other editions.
1. Create your table in MS Word and save as a PDF file.
2. Open Photoshop Elements Photo Editor
3. Open your PDF file
File > Open > navigate to directory
where the pdf is and choose it
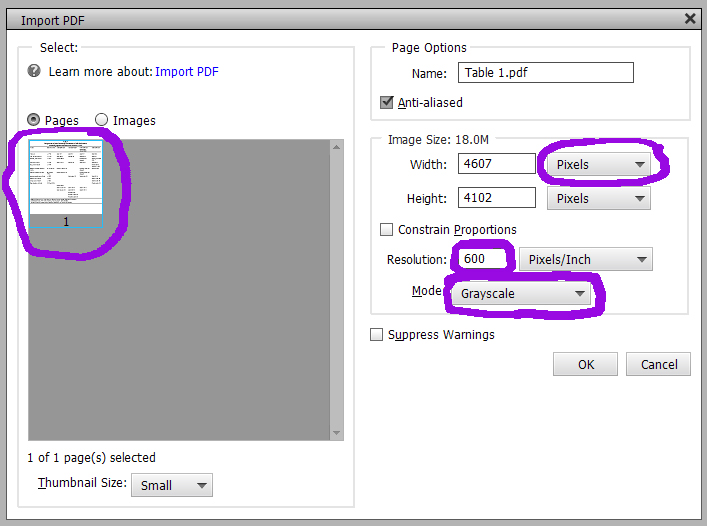
4. Import PDF Dialog box
1. On the left side – click on the
page with your table
2. In the Image Size box
a. Change inches to
pixels
b. Set Resolution to 600
pixels/inch
c. Select Mode. Choose Grayscale
for black and white table or RGB Color for color table
d. OK
5. Flatten the file
The image will open with a
transparent background. To make it easier to see your table, flatten your
image.
Layer > Flatten Image
6. Expand the canvas
When PS Elements opens the PDF file,
it will choose how much white space to leave as a border around part or all of
your table. If you expand the canvas, it will be easier to crop the image to
the size you want.
1. Image > Resize > Canvas Size
2. In the Canvas Size Dialog box
a. Change inches to
pixels
b. Increase the width by
1000 pixels
c. Increase the height
by 1000 pixels
d. In the Anchor box –
highlight the center dot
e. Canvas extension
color: Choose White
f. OK
7. Crop the image
1. In the Modify section of the tool
bar on the left – choose Crop (two overlapping right angles). It’s in the top left
corner of the box.
2. In the Crop box at the bottom of
the screen – choose no restriction
3. With your cursor, draw a box
around your table leaving as much white space as you think you need around the
table.
4. Enter to crop
8. Save your image
1. File > Save As >
2. File Name: Enter your filename
3. Save as Type: Choose TIFF
4. Save
9. TIFF Option Dialog Box
1. Image Compression : LZW
2. Pixel Order: Interleaved
3. Byte Order: Choose IBM PC or Macintosh
4. Save
May 2024


Comments
Post a Comment